
With a click here, and a click there, it can be really easy to mess up a Drupal site, especially if you are fairly new to it. It doesn’t have to be you, in the hands of your manager or client, they can end up breaking the site. Setting the correct permissions will help reduce the risk of this, but sometimes people want more permission than they really should have. And when the site owner comes to you and says - “I broke all the things!” - you immediately wonder when the last backup was. Are backups even running? How do I restore from a backup! Help!
Fix all the things with one click
But you don’t have to live in fear of a broken Drupal site. With just one click, you can quickly and easily restore your Drupal site to its former glory. As soon as your client or boss says “I broke all the things”, you can say “I just fixed all the things!”. They will be amazed at your Drupal harnessing powers.
The ability to restore your Drupal site with one click comes from the Backup and Migrate module. Once you have set it up, it is as easy as pie to use.
Installing Backup and Migrate
Before you start installing and getting to know Backup and Migrate, I highly recommend you initially set it up on a non-critical site. Ideally a site you have running on your local computer. You don’t want to start testing restoring backups for the first time on a live site.
Head over to the [Backup and Migrate] project page to download and install. Or, if you are a Drush user, install with this command:
$ drush en backup_migrate -y
Tip: you don’t need to download and enable modules with separate commands. En (alias of enable) will download the module if it doesn’t exist.
Configure Backup and Migrate
Head over to the Backup and Migrate settings page (Configuration > Backup and Migrate).
Quick backup
The first screen you will see is the Quick Backup screen. You can use this to quickly create a backup of your database. Let’s have a quick look at the options:
Backup my
You can choose to backup your default database, the files directory or the entire site. If you don’t have the code for your site in a source control system like Git, then it is a good idea to backup the entire site. If you do, you can stick with just the default database.
To
At the moment you can only download to download, which means it will download the database to your local computer. We will add more options to that in a moment.
Go ahead and download your default database to your local computer.
Restore
In the restore tab, you can upload the database you just downloaded and restore it. This means that the database your site is using will be replaced.
Save backups
In saved backups, there are no databases at the moment. This is because we have only downloaded the database to our local computer. We haven’t set it up to save in a place that Drupal understands (we will do that in a moment).
Schedules
This is where the fun begins. Rather than manually downloading the database every time, you can setup a backup schedule. This will automatically run the backup when Drupal runs cron.
Before you setup the schedule, you need to setup a backup destination. We will do that in the next step.
Settings
The first ting we need to do in the settings is to setup the backup destination, so that you can then setup a schedule. There is a submenu in the top right, click on Destinations.
You might see a warning that you must specify a private file system path.

Head on over to the file system settings (admin/config/media/file-system). In Private file system path, add the following path:
sites/default/files/private
Head back to the destinations settings. You will now see a Manual Backups Directory and Scheduled Backups Directory. This means that you can now backup your database and have it saved to the private file system path that you set above, rather than your local computer.
Schedules
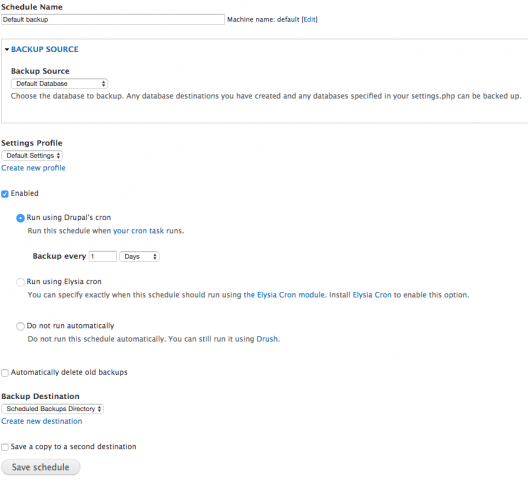
Now that Backup and Migrate can save to Drupal’s private file system rather than your computer, you can setup a schedule. Head back to the Schedules tab and click Add Schedule.
- Schedule name: Give your backup schedule a meaningful name
- Backup Source: As above, if your code is already in source control, just backup the default database. Otherwise, it is a good idea to backup the Entire Site
- Run using Drupal’s cron: You can set how often you want the backup to run.
- Automatically delete old backups You can end up with a lot of backups, so it is a good idea to delete old ones.
- Backup Destination We currently only have one backup destination, the schedule backups directory setup above.
Test by running cron
To test the backups are working, run Drupal’s cron. Go to Configuration > Cron and hit the Run Cron button. Head back to the Backup and Migrate settings and to the Saved Backups tab and you will see the backup you just saved.

Testing the backups
To restore the saved backup, head over to the Restore tab and check Restore from a saved backup. You will see the scheduled saved backup appear.

Before you restore it, test that it is working. Create a new node with a title Testing Backups. This node will now exist in your current database, but not in the backup version. When you store it, it should disappear.
Click Restore Now to restore the database.
Check that the Testing Backups node no longer exists.
Restoring
There are two options to restore the database. The first option is to go to the Restore tab, as in the above step. Click on Restore from a saved backup and select the latest backup from the list.
The second, a slightly more straightforward option, is to click on the Saved Backups tab. This will take you directly to a list of the latest backups and from there, you can restore any database from the list simply by clicking the restore link.

Blast off
That is all there is to setting up the backup schedule. Now if you, or someone else, breaks something on the site, you can easily revert the database by restoring a saved version with just one click.
Taking it further
This is a simple setup. You can take it further by:
- Storing backups offsite in Amazon S3 or NodeSquirrel
- Increasing the frequency of the backups
Note on Drupal 8
The above steps and screen shots are for a Drupal 7 install. There is an alpha version of Backup and Migrate for Drupal 8, but it is not yet stable.